Hey guys today I would like to show you how to edit a picture and remove picture background using Adobe Photoshop which is a great tool that I highly recommend especially considering that you can save yourself a considerable amount of time and money if you learn to edit your pictures yourself. Such skills can come in handy when creating a poster, invitation, website graphics and much more.
This is a Photoshop tutorials for beginners and included with this tutorial is also a video demonstrations that shows how to perform everything that I talk about here. So with that in mind lets move forward.
What will you be learning to do today with Adobe Photoshop?
Today you will be learning to:
- Remove the background of any picture using Photoshop.
- This will make the background transparent and allow objects to fall behind the image or text.
- You will also learn to save your finished picture as a .PNG file which will allow it to retain the its properties.
Video Demonstration
Remove Background from Photo
1. To begin open the picture you desire in Adobe Photoshop.
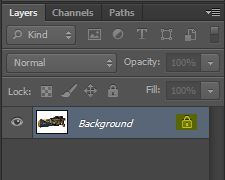
2. If the layer of your picture is locked you will need to unlock it or create a new layer to begin editing.Look over in the right panel and look for layers if there is a lock icon double-click and then OK from the pop up screen.
3. Next from the tools bar on the left find and select the Quick selection tool, that looks like a paint brush pointing downwards, make sure it is set to add to selection which is the plus symbol and start by highlighting the portions of the picture you want to be removed.If you make a mistake do not worry as you can always go to edit and step backwards or forwards easily to undo any mistakes you make.
4. When you have selected all that you want to remove from the picture hit delete on the keyboard which will erase the background. If a section is highlighted that you don’t want use the deselect or the minus to remove the selection.At any time you can undo or redo any selections you want, to master this tool will take time and practice, so practice until you get the hang of it and get comfortable with this tool.
5. When finished hit save and select the file type as .PNG with this format the picture will stay as is, if you use another format the background will become white and lose its properties so keep that in mind as you work.
I hope you guys enjoyed the tutorial and the video demonstration, this is the first of a set of video tutorials aimed at teaching you how to use adobe Photoshop I hope you found this tutorial helpful and you have gained a new skill in heping you to make better presentations, Works of art and more for your personal use.