At sometime or another you will find that you will most likely upload a video on YouTube with details showing that should not show or something you would not want to be seen that you missed in editing.
You can delete the whole video and upload it afresh but you may find that you will loose some traction as the views the video has gained may be lost. Now if you could only edit the video as is and keep it with all its views.
This can be done and you most likely have been missing the feature as it is a part of the YouTube video editor. It can seem very complicated but it not that bad and its best you learn to use it now before the need arises and you have no clue what to do.
What doe the Blur look Like?
The Blur is very advanced and you have two types which includes a Face Blur and a regular Spot blur that you can adjust to fit a varying sized area.
The blur is also a full blur that will hide whatever is beneath the blurred area so that it cant be read or seen.
Video Tutorial
Watch the video tutorial and learn everything you need to know and learn about using the YouTube Video Editor.
How to Use the YouTube Video Editor to Blur after upload
First you must have a video that uploaded that needs to be blurred. This can be any of your many Videos or one you just uploaded or you have scheduled to be posted.
1.Go to YouTube Control center where you can see your channel videos.
2.Click edit or details on a video so you can see and edit the details, this is a pencil like icon.
3.Once on the edit screen for the details look in the lower right of the screen and click Editor.
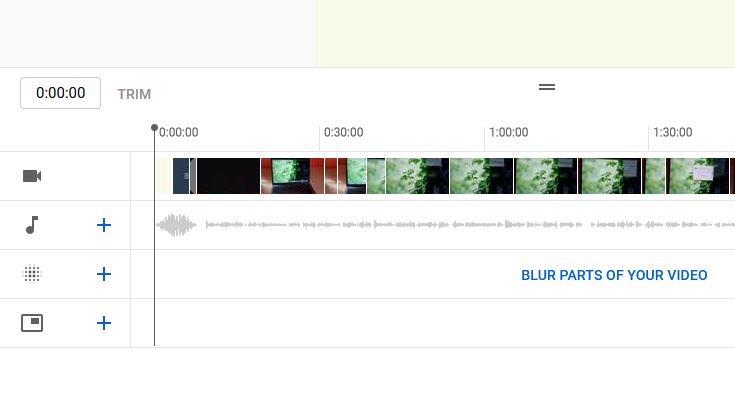
4.Once on the Editor Screen play the video to just before the part you want blurred. Now click the blurry looking icon beside the time line for the video just below the music icon.
5.Choose between custom or Face blur. Do notice that Face blur can scan videos automatically and choose faces to blur. The custom or spot blur must be added to the time line and you can drag the blue line to match where to start or finish.
Also adjust the area to be blurred making it as big or as small as needed.
Before You Go
As always please let me know how we did on this one? Did we mess up or did a great job. A share would be appreciated as always and please take the time now and share the guide.