I am here today to show you how to go about replacing the Keyboard on Any HP 15 Series of Laptops. This guide will show you what to do step by step with a video demonstration.
This article will contain all you need to easily replace your Keyboard. So bookmark this article and see what you will need to begin below.
Throughout this tutorial I will be using a HP 15-f003dx, but not this is for demonstration as the guide is the same for any HP 15 Series Laptop.
Who does this Guide apply to?
This applies to any one that has a HP 15 Series Laptop or HP Laptop in general with Keyboard issues such as the entire keyboard is not working, half of the Keyboard is working or some keys are dead and the Keyboard needs replacing.
Sometimes keyboard die because Kids Play Games on them or the keyboard may die naturally over time especially if you have had your device for at least a year or two.
What do you need?
For this tutorial you will need:
1.A Screw driver set or a Philips Screwdriver.
2.A pair of forceps or opening tool from a Laptop tool set or substitute you can find around the house.
3.A Exact match Keyboard Replacement.
Video Tutorial:
This detailed video tutorial guides you on what to do step by step. Simply click play and watch or read the directions below.
How to Replace a HP 15 Series Keyboard?
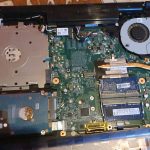
1.Power off the Laptop and flip it over and remove the battery.
2.Remove the one screw on the back that’s marked with the Keyboard symbol.
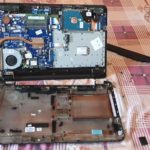
3.Using the Forceps or prying tool get between the grooves the the Laptop and lift the keyboard. Use your hands to lift the freed sections and move along until you lift the Keyboard up totally.
4.Don’t yank the Keyboard up totally. Next un-clip the ribbon cable from behind the keyboard. The black clip can be picked up using your fingers to loosen the ribbon cable (Found at the end of the white section to which the ribbon cable is connected). Once done remove the keyboard totally.
5.Install the New Keyboard. Put it in place and make sure its all the way in. When secured go ahead and press the black section of the clip back down in place to secure. Snap the keyboard back in.
6.Power up and test the keyboard which should work now. If it does not work you did not push the ribbon cable all the way in and you will need to repeat the steps above.
Remember to replace the Screw at the back and the Battery for the Laptop when everything is done correctly.
Before you Go
Before you go please remember to share this guide and be sure to comment below as well as check out our other content as well here on the website.

You say this applies to any hp 15. But mine is different in the back. I have a 15z-1f